Saturday, May 13, 2017
Tuesday, June 11, 2013
Rethinking my soil
Well apparently I still won't be getting my veggies in ground yet. Since I was making holes in my ground for the poles to hold up the shade cloth, fence, and bird netting, I think my soil still has a little too much clay. Even after getting the 3 truck loads of horse manure with the 20 3 cu. ft. bags of garden soil, and 2 trucks loads this year. I realize I need to go ahead and add the garden soil this year too. After all I did have the soil dug deeper this year.
This week I want to talk about the seedlings. I have been using those Jiffy seed starting disks, and have never had a problem using them till this year. I have been having a problem with seedlings failing. There sometimes is a white mold that grows at the top of the disk that has been killing the seedling. I have actually never had this happen before till this year. What I finally realized I was doing differently was three things. One, that I was over watering the discs after the seeds have sprouted, two, that I had actually purchased a few of Jiffy's seeding trays, and started the seeds in them, and three, that I didn't have any moving air around them.
Lets start with the first issue. That white mold eats away at the base of the plant. It's that simple.
Second issue. The seedling trays are set up so the disks sit side by side impeding air flow which will stop the growth of the mold. In the past I have always used a large plastic tray. The one you put under potted plants. The disks have always been placed apart from each other.
Third, The moving air is necessary to help stop the growth of the mold.
When you do use these types of seed starters. Once the seeds have sprouted pull back on the watering. They only need to be kept wet while waiting for the seeds to sprout. For me once they sprouted I watered a little every two days.
Have a good week.
Tuesday, June 4, 2013
Fence around the veggie garden cont...
Well to start off, I seem to have miss placed my camera, so I won't be able to take pictures of the fence up around the garden. I did manage to also get a little gate up, so at this point I just have my plants to plant, and get the shade cloth to get up.
Watering in the Desert
The issue of watering is extremely subjective. The reason being that our soil is clay, or caliche which is just a more compacted rocky clay soil, or sandy. One of the hardest questions to answer at work is "how much do I water this plant. I don't know what type of soil they have, so it very difficult to answer that question. If you have clay soil; that soil will hold on to the water longer. If you have sandy soil the water just runs through it. If you have sandy soil you will be water a lot more often.
In pots water till the water comes out of the bottom of the pot. In ground water to the depth. of 8 - 9" for shallow rooted plants. Shrubs to the depth of 14 - 18". Trees water to the depth of 22 - 28". You can test this in clay soil 20 minutes after the water has shut, off by taking a skinny plant stake, and shove it in the ground. When the stake stops, you have just hit dry soil. Grab it at soil level, and pull it out of the ground, measure how many inches went into the soil. If you didn't reached your desired inches you know that you need to increase your watering time. I have a peach tree I am watering once a month at the moment because I water it to 22". The clay is really holding that water, or the roots have found an under ground water source.
What I like to tell people is; in 85° and up, your 6 packs, and 1- 2 qt. nursery plants; in pots water everyday. In ground water everyday, and to watch for the signs of over watering in both situations. Which will be for the majority of the plants out there, starting underneath leaves turning solid yellow and dropping off. That is actually the second sign of over watering. The first you have to be paying more attention to the plants. The first sign is plants that just aren't producing. Not as many blooms as there should be, and slow to no growth. When this happens cut back on your watering.
Clay soil
How do you know if you have clay soil. You soak a spot of the ground, grab a hand full, and squeeze it. If it stays in form you have clay. If it falls apart in your hand you have sandy.
Clay soil helps to hold the moisture. All you do is add your amendments to the soil, ( I like 50% clay 50% amendments) and grow to your hearts desire. For anyone who doesn't know what I mean by amendments; that means any of these, composted horse manure, composted steer manure, compost you make yourself, garden soil, compost you purchase at the store. Mulch, ( as long as it is not just strait bark. Which is used for decoration or helping to keep moisture in the soil around your landscaped plants.)
By the way when you get your compost home and you open the bag and find white mold growing on the soil. There is nothing wrong with the soil. That is the natural thing soils do to break down to soil. It is beneficial fungi interacting with other parts of the soil, and micro nutrients are necessary for plant growth. Another thing. There is nothing wrong with wood chips, or bark in you compost. When wood breaks down it becomes nitrogen for the plants.
Sandy soil
What is there to say, you need to add a lot of compost to it to get it to hold water.
That is the basics of watering in the desert. If you have questions for your own situations feel free to ask.
Tuesday, May 28, 2013
Fencing Out the Puppies


Well I was hoping that I was going to get my veggies in ground this week. Oh well these things happen. At least I got the poles cut, drilled and in, so all I have to do next week is plant, and set my irrigation.
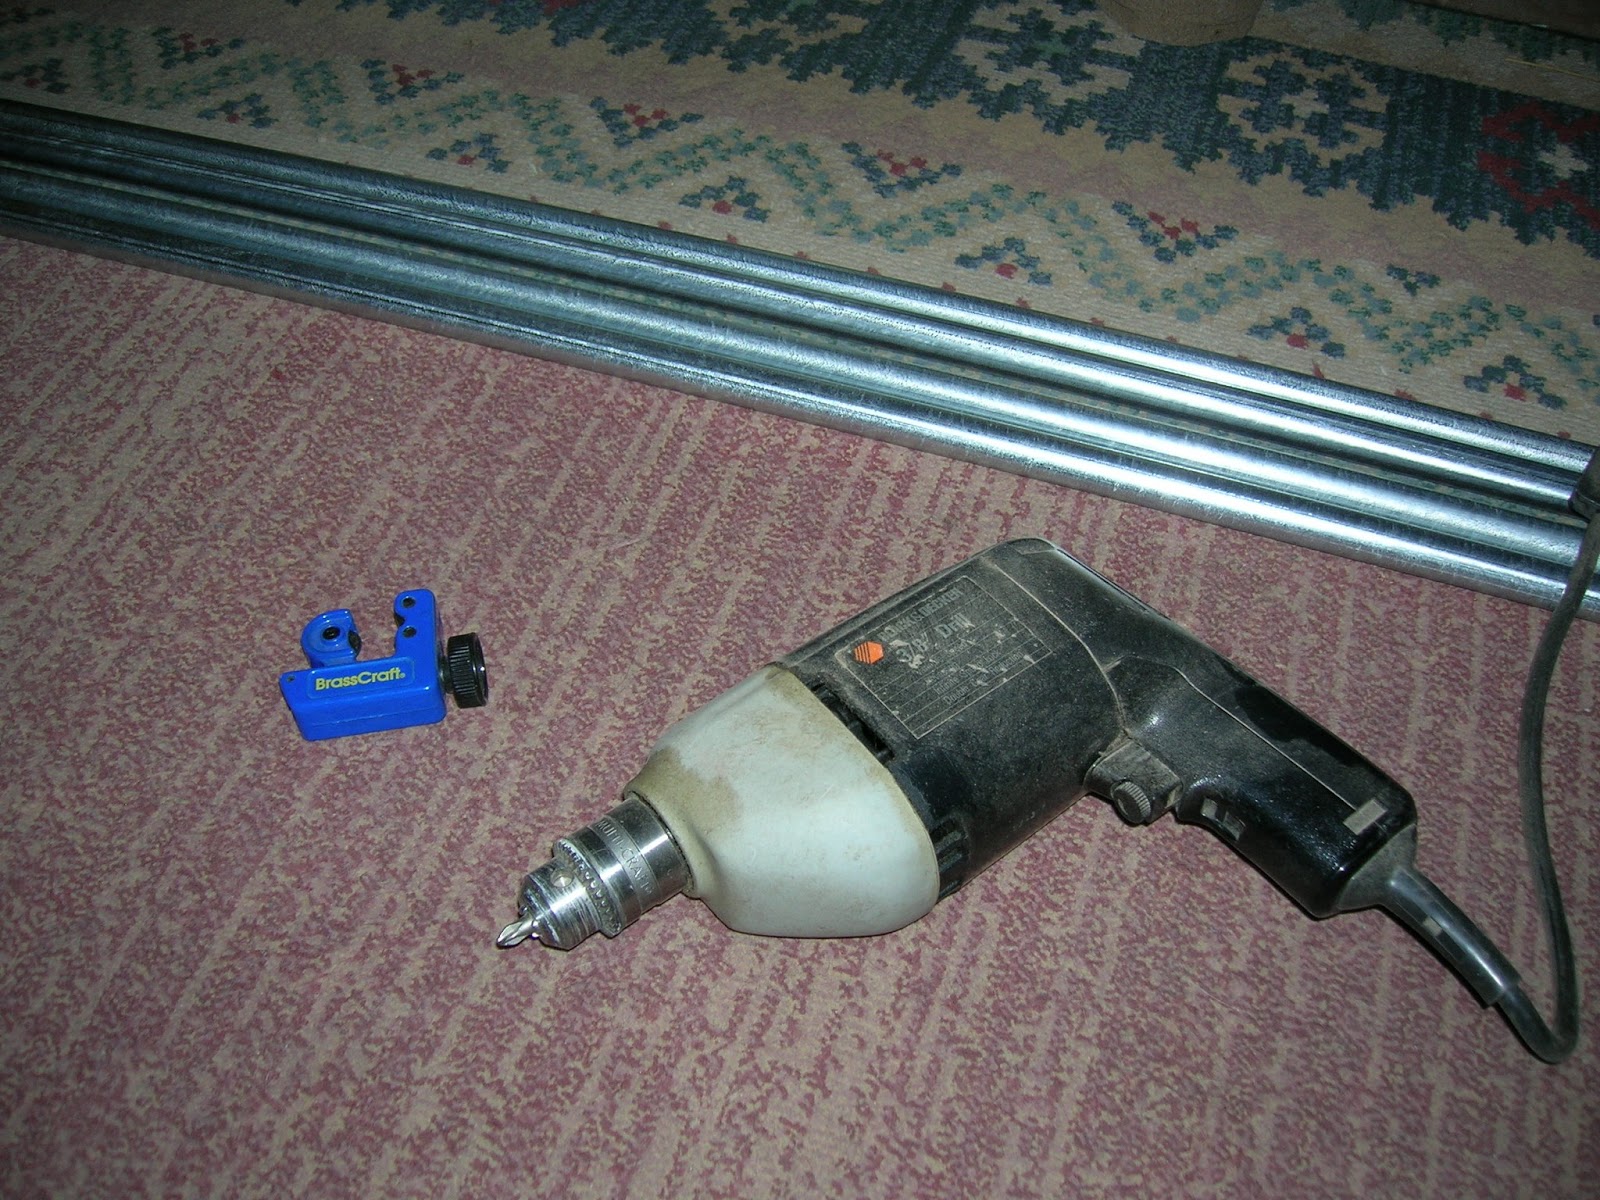
Well let's get started. I am using the 10' metal electrical conduit for poles. The reason, in the past I use to use the 8' green garden stakes. I discovered when a good wind would pop up, they would bend with the shade cloth attached. FYI those green garden stakes are like 5 dollars and change. The conduit is 2 dollars.
You need drill, and a metal pipe cutter. I cut two feet of the pipe off, and drill two holes in the top of the pipe.
After I cut all my poles. I measured off the garden, and decided where to place the poles. I am placing the poles every 6' apart. Not only are the poles for holding up the shade cloth, they will also hold up the bird netting, and the outer poles will have the fence attached.
I have most of my poles up. I was shy 3 because I was originally going to space the poles every 7'. When I go to work tomorrow I'll pick up the other 3 poles I need. I drilled the holes with the water. The same way I drilled the holes in the soil for the trees that were over watered, in my second blog.
At this point it was getting too hot to work. I was thinking of putting up half the fence this evening, but I realized that I need the puppies to see the fence, and not run into it while they are playing. They do play rough.
Well that is all for this week. Next week the finished fence, and veggies in the ground. Yesssss.
Tuesday, May 21, 2013
Preparing the soil before tilling
Here in the desert we have a clay soil. AKA caliche soil. For the most part as long as you soak the soil the day before, and I mean for an hour. Like any other clay once wet it is putty in your hands. For those of you who have the true caliche soil which is usually about 2' below the top clay soil, you only need a garden depth of 14 to 16 inches. As long as you are not over watering your veggies you should never have to deal with the issues that arise from not breaking through the caliche. I set my water timer for 15 to 20 minutes.
So I tilled my soil today. I borrowed a friends truck, and rented a tiller at 8:30 am started tilling around 9am, and finished at 10:45. Yep that's it. That's all I did today. I wanted to get the poles in the ground today, and put the fence up to keep the dogs out, but living in the desert the heat won, so that is all I have for you.
Choosing tomato's
I don't belive I informed you about the type of tomato to choose. There are two types of tomatoes. Determinate, and Indeterminate. Determinate tomatoes will only produce for 3 weeks. That's it. Now unless you want to plant one every three weeks then go for it. For as many tomatoes that I want, I don't want to keep planting every three weeks. Indeterminate tomatoes will keep producing till the freeze comes, and if you protect them from the frost they will keep producing.
Well this is a very short blog this week. Join me next week for the finished garden.
Woo!! Freakin" Hoo!!
Tuesday, May 14, 2013
Irrigating your Garden


Well I figure that I better get my above ground irrigation fixed before I plant the veggies in ground. I refuse to water by hand.
This is my irrigation system. I chose to do above ground because with an in ground garden you are always digging and or tilling in the soil from time to time. The manifolds needed to be replaced because some little hairy 4 legged creature was chewing on it. This creation of mine is hooked up to a garden hose. On the spigot I have a hose timer. When I leave for work in the mornings at 4:30 am, I turn on the timer for 20 minutes. Here in the desert it is very important that I water early. Reason is that the water in the hose heats up, and you don't want to water with hot water.
The part I have circled is a calcium inhibitor filter. I change this out every year. The first year I made one of these I was always splicing out my garden drip emitters because the calcium was clogging the emitters.
That filter I got out of the area where the mister systems are sold. It can screw onto garden hoses. The other end of the filter screws onto a female PVC garden hose adapter. The order I have connected all these parts is as follows.
3' leader hose found in the garden dept. screw into the filter, screw that into a female PVC hose adapter,
1. glue onto 4" 3/4 piece of PVC pipe 2. glue onto 3/4" PVC Tee
3. glue onto 8" 3/4" PVC pipe 4. glue onto 3/4" PVC Tee with threads for the nipple
5. nipple screws into the Tee 6. 8 port manifold screws onto the nipple.
7.Other end of Tee; glue on an 8" 3/4" PVC pipe 8. glue a 3/4" Tee onto the PVC pipe
9. Glue a 4" 3/4" PVC pipe into the Tee 10. glue a 3/4" male PVC hose adapter onto the Tee,
or if this is all you need glue a 3/4" PVC cap onto the pipe.
(above: an 8 port manifold. They also come in 2 and 4 ports.)
On your two Tee's they will be open on the bottom. Glue a plug into them.
In the above picture, what I have circled is from the left a female hose adapter, a shut off valve, a male PVC hose adapter. The reason for the shut off is for those veggies once their roots are deep enough over watering starts to happen, so to avoid over watering I shut the flow of water for one day. Th manifolds is what you attach you. That part I will show when I put the veggies in ground.
Feel free to ask any questions below.
Tuesday, May 7, 2013
Making A Garden For Your Plant Eating Dogs.
Once upon a time there was a little girl who grew up in the desert. Her Mom taught her everything she knew about growing plants. As the little girl grew up almost every place she lived, she would have a garden. Even living in apartments she found a way to grow veggies in pots.


Once upon a time there was a little girl who grew up in the desert. Her Mom taught her everything she knew about growing plants. As the little girl grew up almost every place she lived, she would have a garden. Even living in apartments she found a way to grow veggies in pots.
Then one day the little girl got puppies.
Yes that is one of the little monsters. Her Brother is camera shy, and they did this to her garden. Actually Katara is the culprit.
Her Brother Sokka is the digger, and he is not digging for cool place to lay. Anyway back to the story. For the longest time the puppies left the garden alone, because it was surrounded by bird netting. Katara discovered that if she pulled on the netting, she could put a hole in it big enough to get through. Katara started on the tomato plants first. Since the little girl knew that the tomato plant is from the nightshade family, and also read that the plant can damage the liver, the little girl decided to pull up the tomato plants.
Well without any tomato plants to chew on, Katata found the eggplant to chew on. This plant was also not good to chew on since it was also giving the puppy the runs, so the little girl pulled up the eggplant also. The squash was already attacked in August by a small grub the little girl had never seen before. She will use diatomaceous earth on the squash stock more often next time.
The little girl realized that the puppy has a need to chew on plants, so instead of punishing the puppy, the little girl decided to make the puppy her own garden.

The little girl discovered that Katara likes to lay in this spot, so she is planting herbs to start out. Two mint plants in the front, and one basil in the back. The little girl figures that once the mint takes holed, it will be difficult for the puppy to destroy it.

Ok yes, I decided to use the bird netting. I only need it to survive her a couple of weeks. I need to use the garden fence for the garden.
THE END
Subscribe to:
Posts (Atom)